AZURE TRAFFIC MANAGER – STEP BY STEP DEMO (PERFORMANCE METHOD)

In the previous article, I showed you how to set up Priority Method in Azure Traffic Manager. You can read that article here : Azure Traffic Manager – Step by Step Demo (Priority Method)
In this one, I am going to show you how to set up Performance Method.
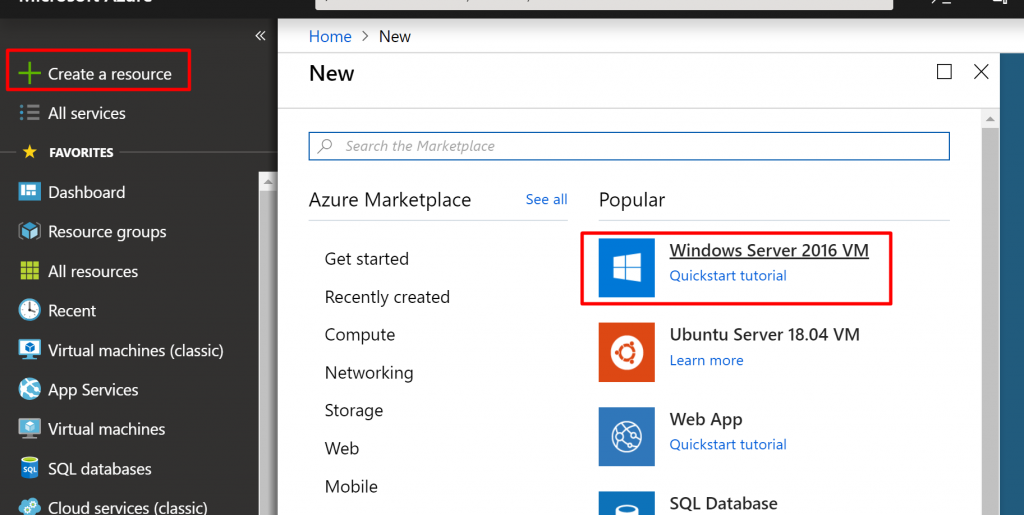
Step 1) Login to the Azure Portal and click on Create a resource. Find Windows Server 2016 VM and select it.
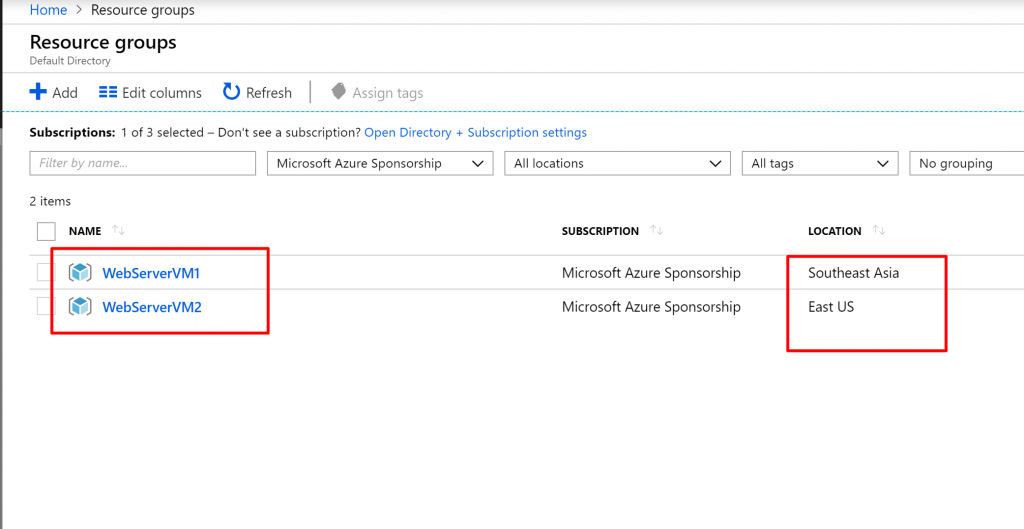
Step 2) Create a new resource group with the name WebServerVM1 and give the same name to the virtual machine. Select Southeast Asia as the region. We don’t need any redundancy options for this demo. Select Standard DS1_v2 size. Set username and password.

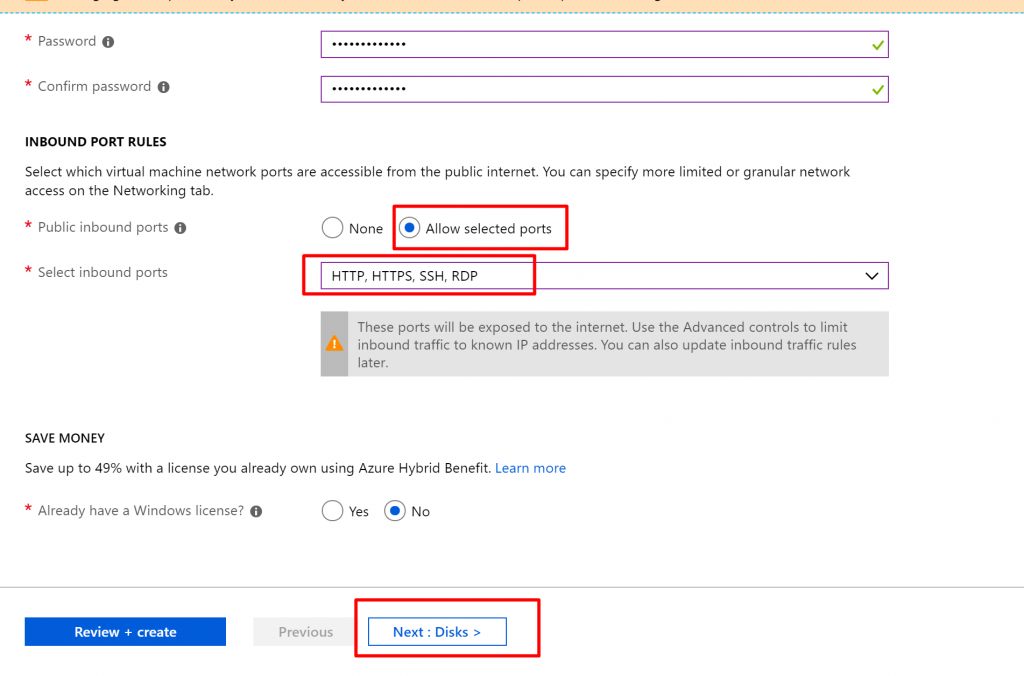
Step 3) Allow inbound ports and select all of the ports listed i.e. HTTP, HTTPS, SSH and RDP. Then click on Next to go to the Disks section.
Step 4) Select Premium SSD as the OS disk type and click on Next to go to the Networking section.

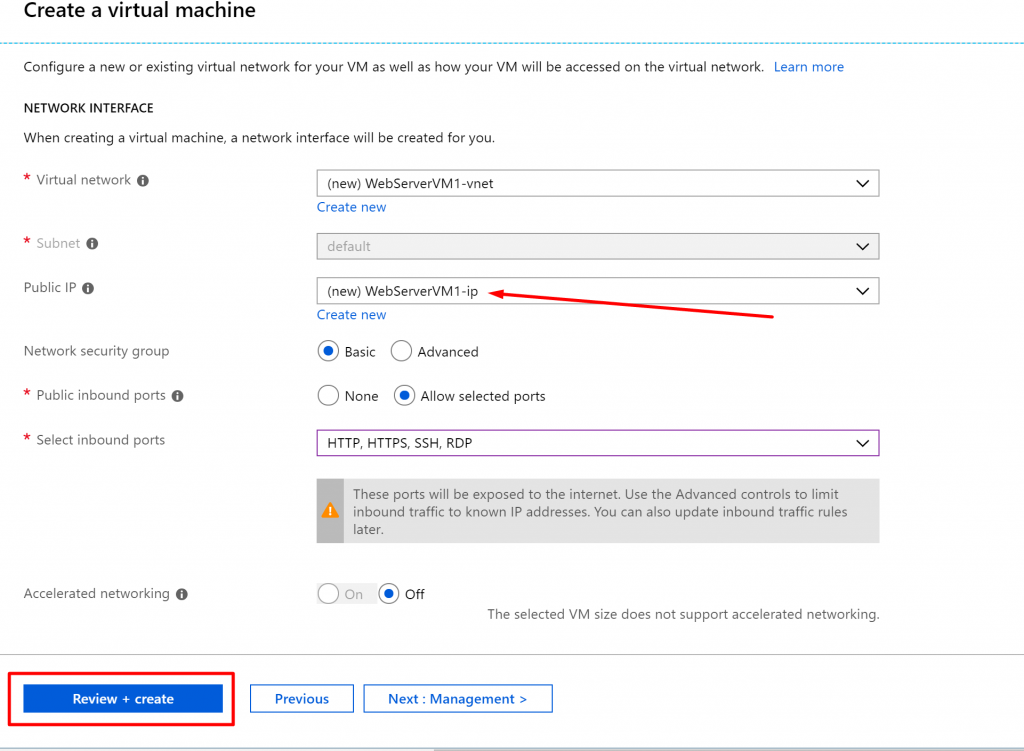
Step 5) There is not much to do in the networking section. You can see that it is going to create a new virtual network, a new public IP address and a network security group by default. It has also mentioned the inbound ports that we have selected earlier. We can go with the default settings in Management and Guest Config, so click on Review + Create.
Step 6) Once the validation gets passed, click on Create.

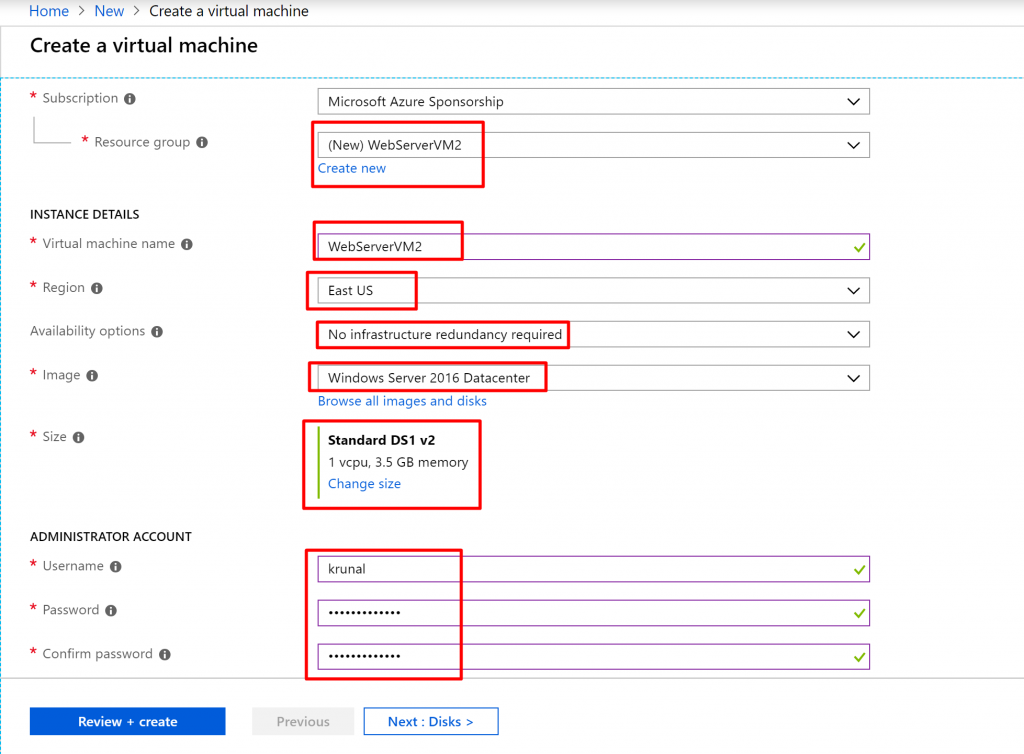
Step 7) Similarly, create one more VM with the same image i.e. Windows Server 2016 Datacenter. Create a new resource group named WebServerVM2 and give the same name to the virtual machine. This time, select the East US region. Again, no redundancy is required. Select the same size i.e. DS1_v2. Give username and password.
Step 8) Allow selected ports and select all the listed ports just like you did while creating the first VM. Click on Next to go to the Disks section.

Step 9) Select Preimum SSD and click on Next.

Step 10) Take a look in the networking section. Here also it will creating a virtual network, a public IP address and a network security group. And the selected inbound ports would be displayed. Click on Review + Create and once the validation gets passed, click on Create.
Step 11) So now you will have two resource groups. WebServerVM1 will be in Southeast Asia including the VM inside and it’s associated resources. WebServerVM2 will be in East US including the VM inside and it’s associated resources.
Step 12) Now go inside the WebServerVM1 virtual machine and click on Connect. Select RDP and download the RDP file.

Step 13) Once the RDP file gets downloaded, open it and click on connect. It will ask you for the credentials. Provide the credentials that you mentioned during the creation of the VM and connect to the Virtual Machine.

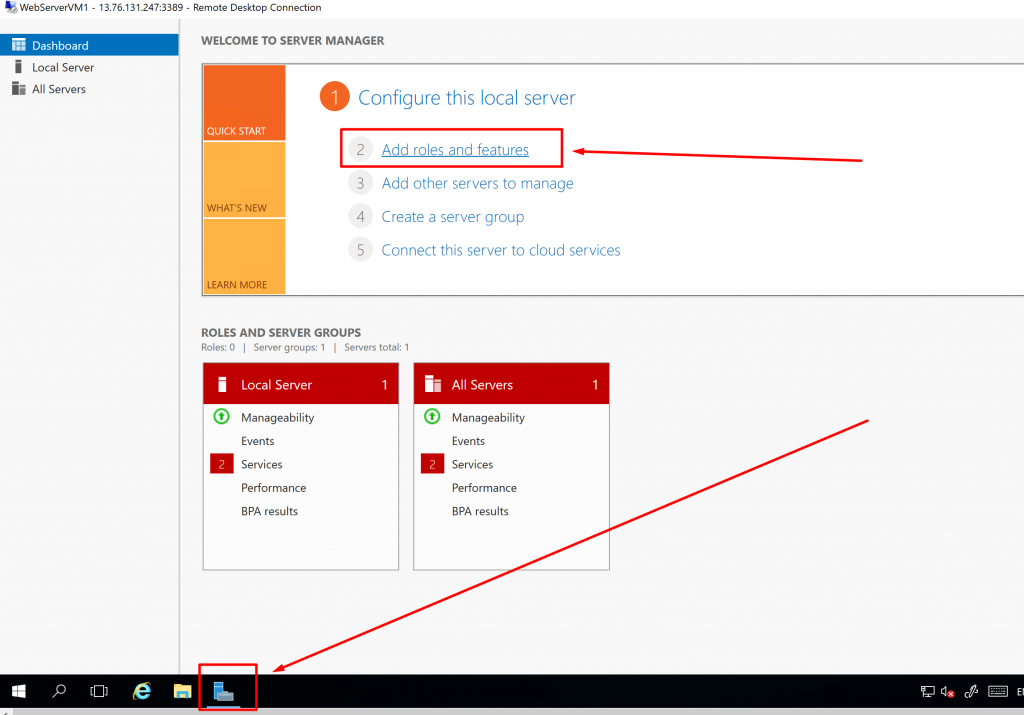
Step 14) Inside the VM, go to the Server Manager and click on Add roles and features.
Step 15) Select Role based/feature based installation and click on Next. Select the server from the list and click on Next.

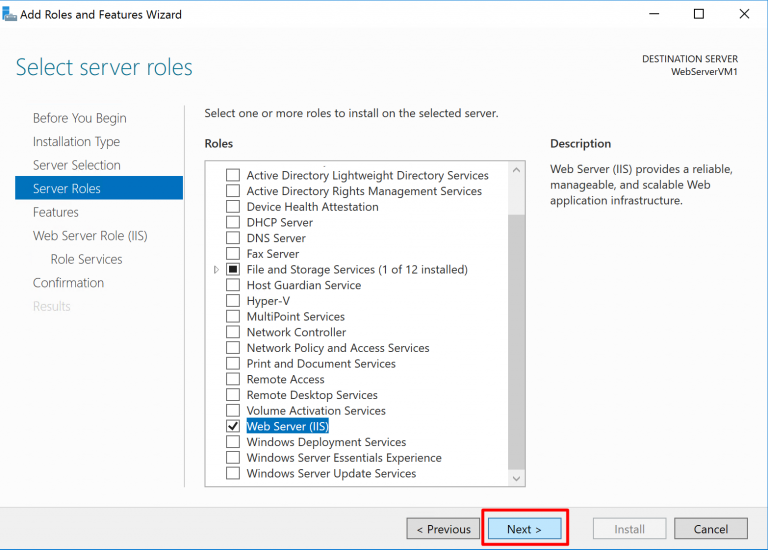
Step 16) Select WebServer (IIS) from the list of server roles. It will open up a new dialogue box. Click on Add Features.

Step 17) Click on Next. Then it will ask to select features. Keep everything as default and click on Next.
Step 18) In IIS overview, click on Next and in the role services too, keep everything as default and click on Next.

Step 19) Click on Install.

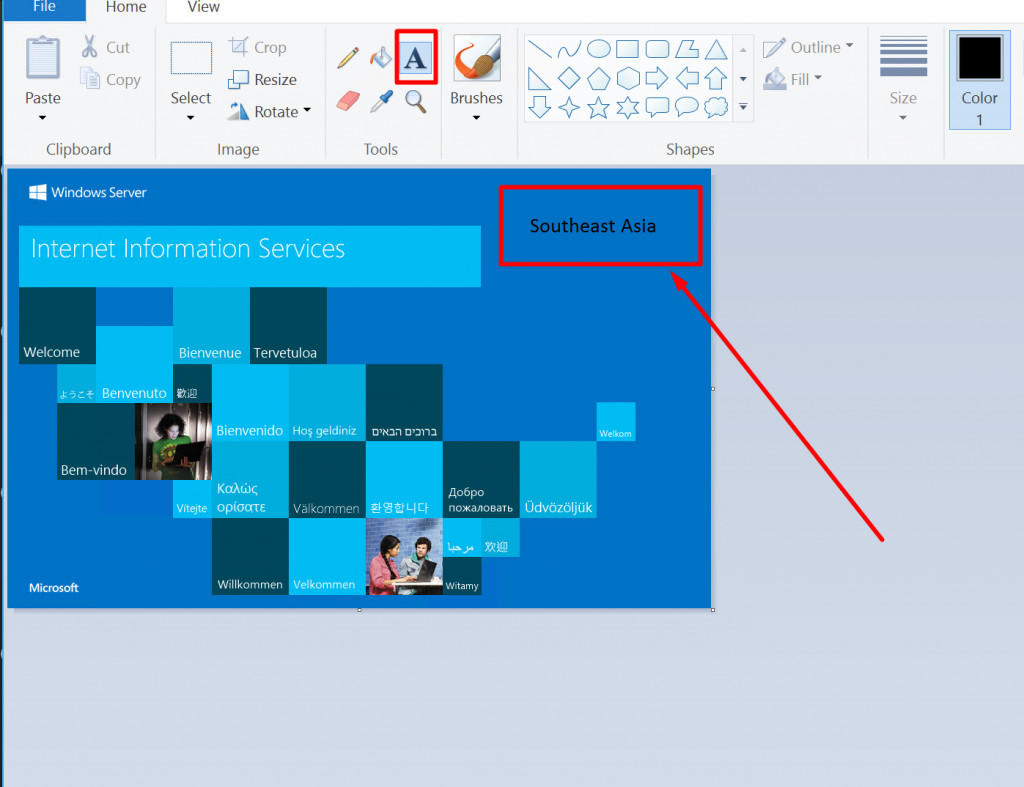
Step 20) After the installation gets completed, go to the path: This PC –> C Drive –> inetpub –> wwwroot and open the iisstart.png file.

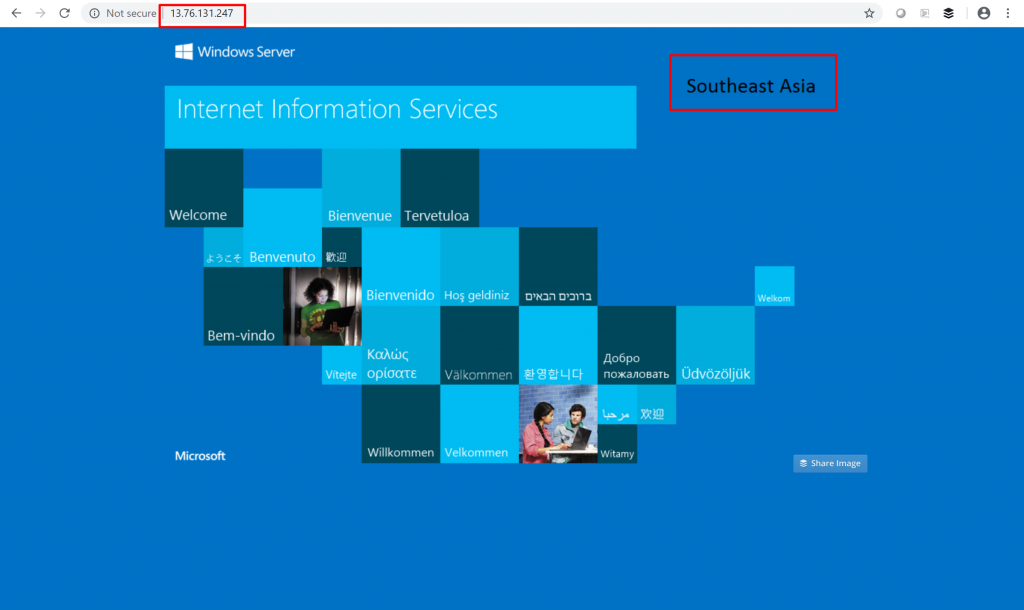
Step 21) It will open up the file in paint. Add a textbox there with the text Southeast Asia. This will help us differentiate between both the servers.
Step 22) Back in the WebServerVM1 virtual machine’s overview, copy the public IP address of the VM.

Step 23) Paste it in another browser tab. This would be the output. You will also see the text that you just added i.e. Southeast Asia.
Step 24) Now for the WebServerVM2 virtual machine, we need to do the same things. So, for WebServerVM2, repeat from Step 12 to Step 20.
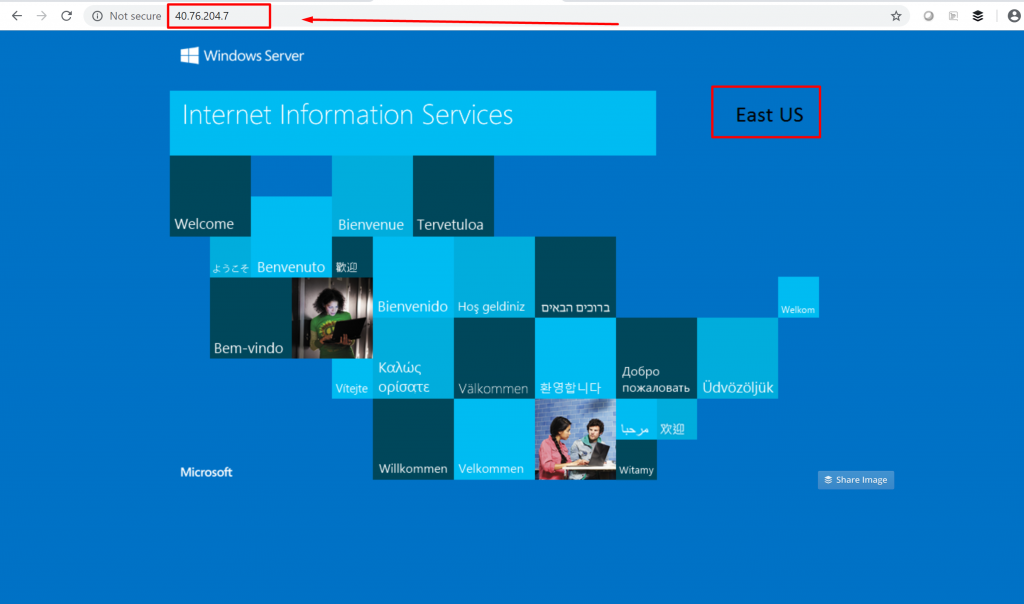
Step 25) And then when you open the png file, add textbox with the text East US since this server lies in the East US location. Save the file.

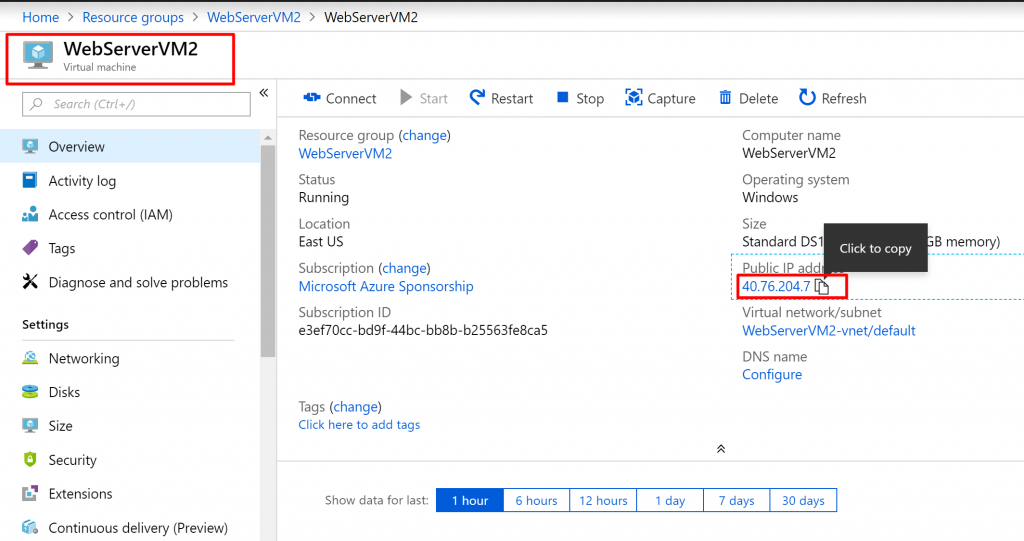
Step 26) Back in the WebServerVM2 virtual machine’s overview, copy the public IP address and paste it another browser window.
Step 27) The output will be something like this with the text East US visible.
Step 28) Before we go and create the traffic manager profile, we need to configure the DNS names for both of our VMs. So, go to WebServerVM1 virtual machine’s overview and find DNS name. Click on Configure.
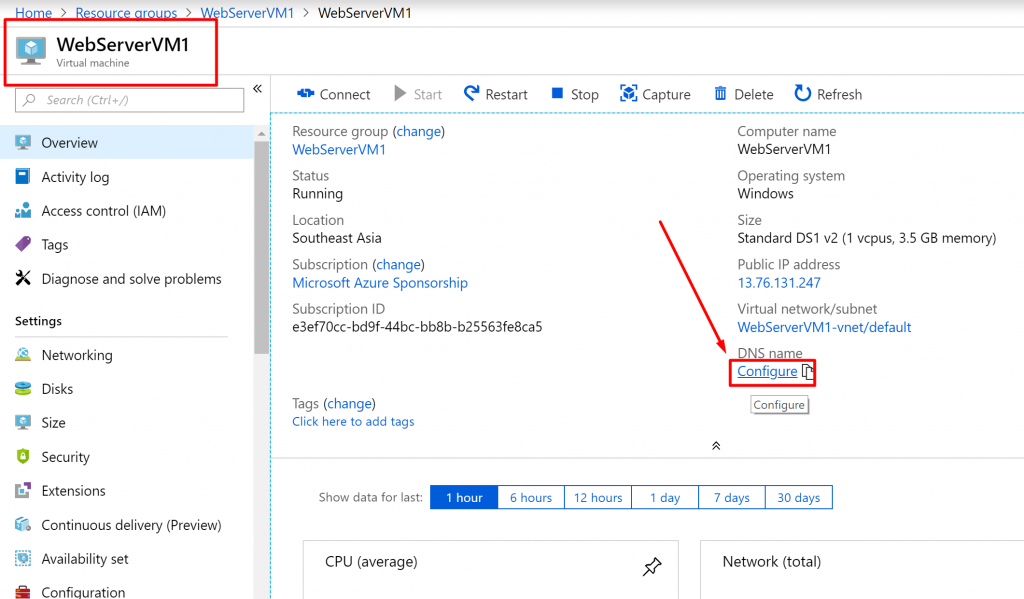
Step 29) Give name ktwebserver1 to the DNS name and label and click on Save.

Step 30) Back in the VM’s overview, you can refresh to see the DNS name.

Step 31) Do the same thing for WebServerVM2 virtual machine and configure its DNS name to ktwebserver2.

So now we have configured IIS in both the Virtual Machines. We have also configured the DNS names for both the Virtual Machines. Next, we need to create a traffic manager profile to divert the traffic according to our needs.
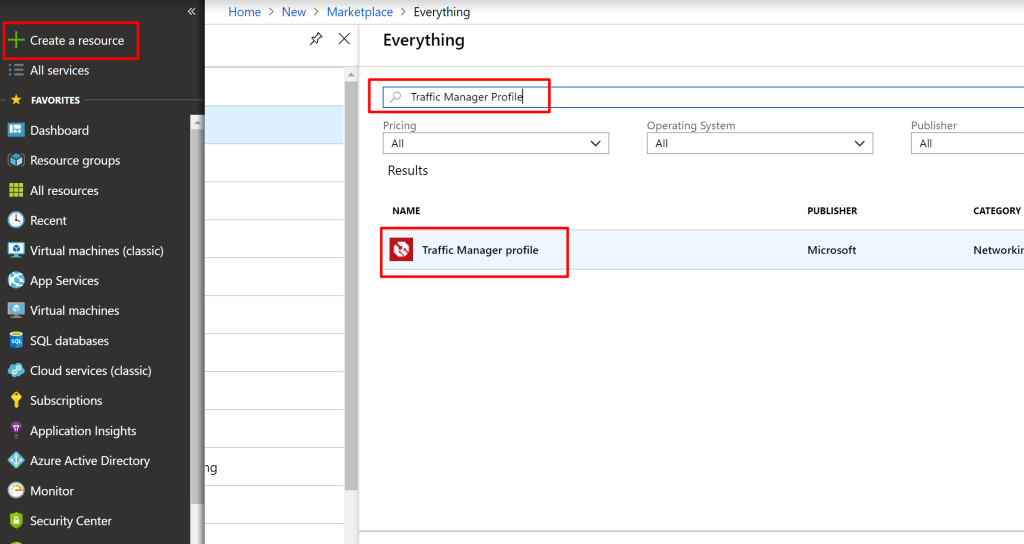
Step 32) Click on Create a resource and search for Traffic Manager Profile. Select it from the results and it will open up a new blade. Click on Create.
Step 33) Give name ktdemo and select the Performance routing method (you can change this later). Create a new resource group with the same name i.e. ktdemo. Keep the location as West Europe.

- Performance method can be used when you want users to use the closest endpoint in terms of the lowest network latency.
- So when we will hit the request from the VM that is in Southeast Asia, it will redirect us to the Southeast Asia’s server. And when we hit the request from the VM that is in East US, it will redirect us to the East US’s server.
- However, if I hit the request from my own machine, which is closer to the Southeast Asia region, it will redirect me to the Southeast Asia’s server.
- Depending upon the location of your request, it will check the network latency and direct you to the server according to it.
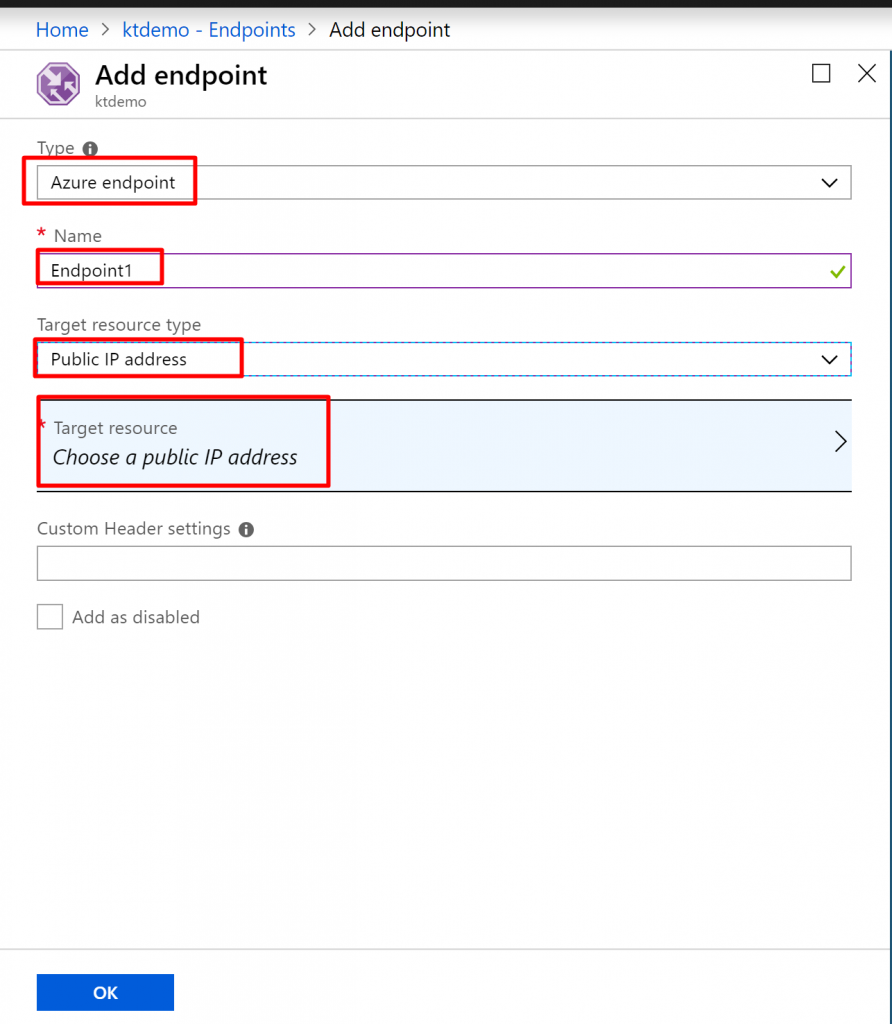
Step 34) Once the traffic manager profile gets created, go to it and then go to the endpoints tab. Click on Add to add a new endpoint.

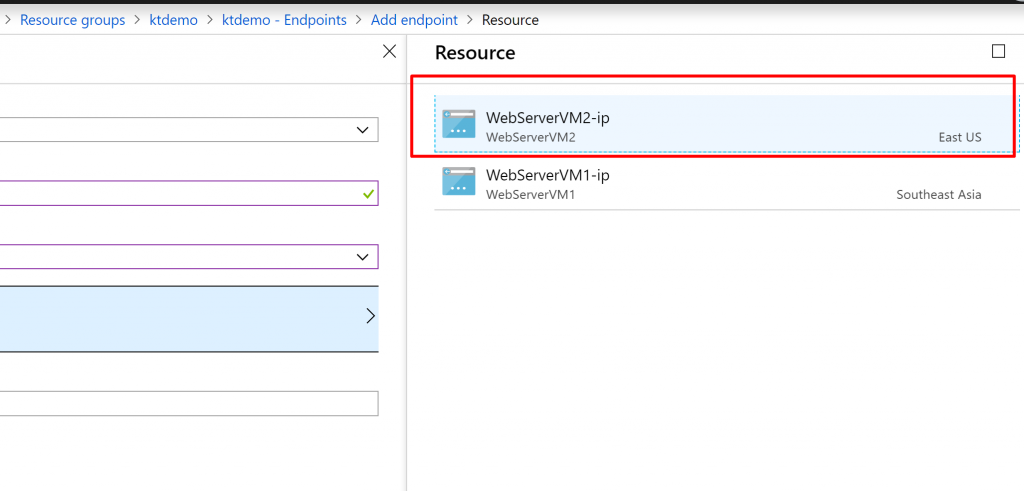
Step 35) Select the type as Azure endpoint since our web app is hosted in an Azure VM. Give name Endpoint1. Since our web app is in a VM, select the target resource type as Public IP address. Click on Choose a public IP address to select the target resource.
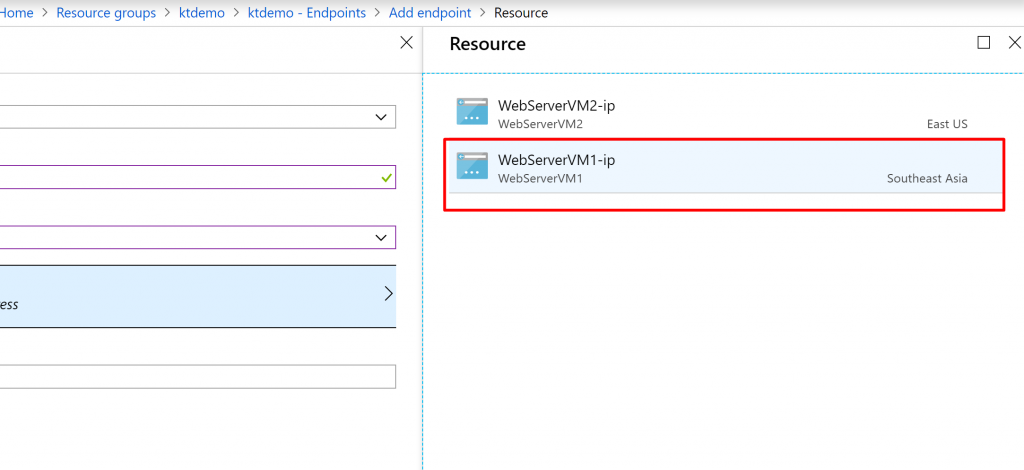
Step 36) Select WebServerVM1-ip which is in the Southeast Asia location.
Step 37) Click on OK.

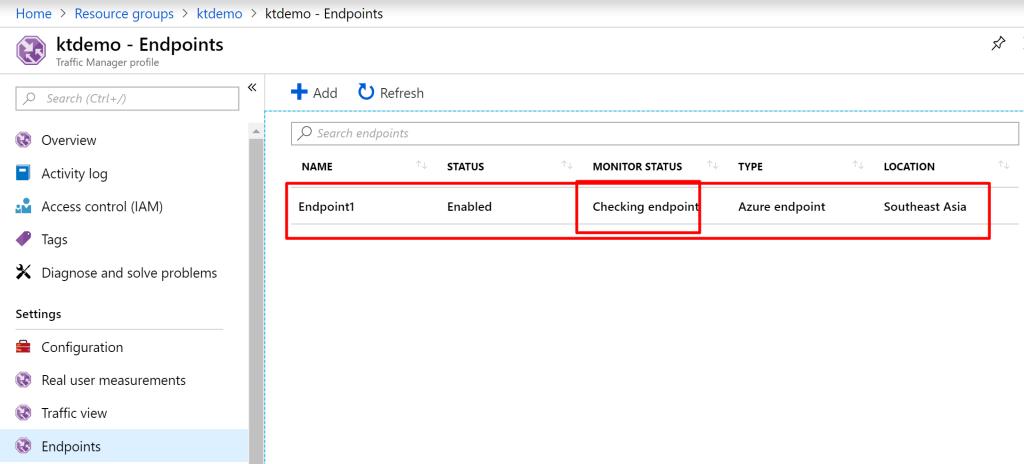
Step 38) Initially, it will show the monitor status as checking endpoint. After several minutes, it will change the status to online.
Step 39) Add one more endpoint. Select type as Azure endpoint, give name as Endpoint2 and select the Public IP address as the target resource type. Click on target resource to choose the IP address.

Step 40) This time, choose WebServerVM2-ip which is in the East US location.
Step 41) Click on OK.
Step 42) After some time, you will see that you have both the endpoints enabled and online. One is in the Southeast Asia location and another one is in the East US.

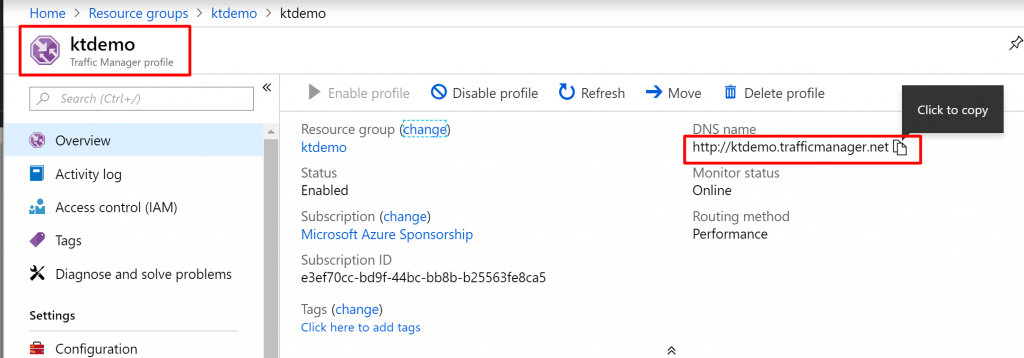
Step 43) That’s it. We have configured everything that we needed to. Now we are ready to see this in action. Go to Traffic Manager Profile’s overview and copy the DNS name.
Step 44) Go to WebServerVM1 and open the browser in it. Paste the DNS name that you just copied. You will see that it directs you to the server located in the Southeast Asia because the request itself has been fired from the Southeast Asia location.

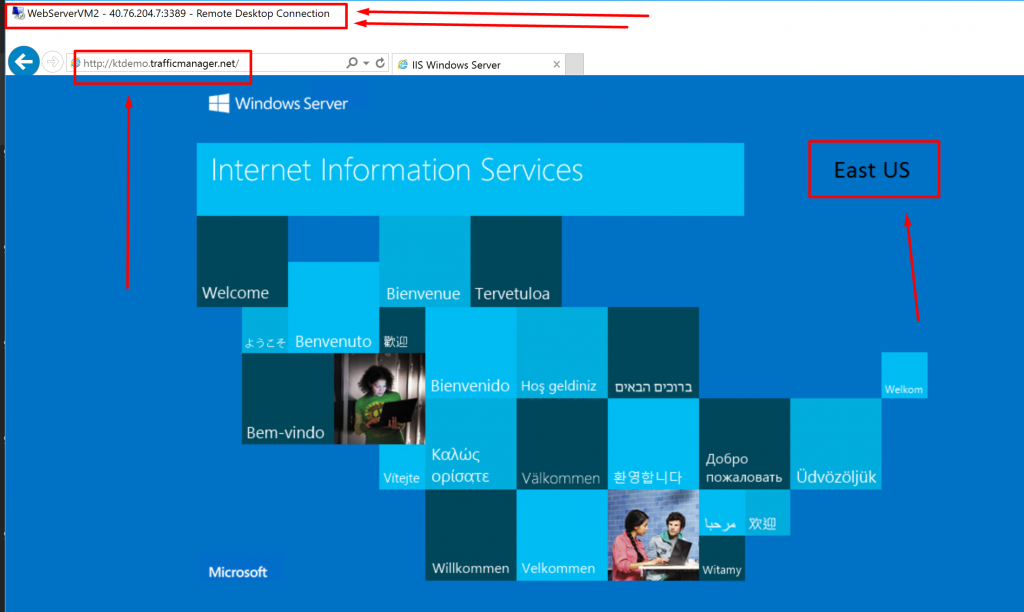
Step 45) Then go to WebServerVM2 and open the browser there. Paste the DNS name of that you just copied. Now you will see that it directs you to the server located in the East US because the request itself has been fired from the East US location.
Step 46) If I paste the DNS name in my own machine’s browser, it will direct me to the server located in the Southeast Asia region because that is closer to me and my network latency suits that location. If you hit the request from your own machine, it will direct you to the server based upon the network latency between your local DNS server and the hosted DNS server.

- That was it for the performance method of the azure traffic manager.
- In the next article, I am going to explain how you can implement geographic method of the Azure Traffic Manager.
Note: If you wish to perform the geographic routing after this, do not delete the resource that you created in this demo.